

How to Repair Cracked Floor Tile
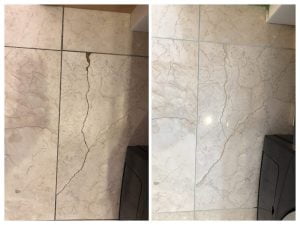
Marble floor Crack repair.
Welcome to Hardfloor Restoration, your trusted partner for all your tile repair needs. Cracked floor tiles can be both an eyesore and a potential hazard. Whether it’s in your bathroom, kitchen, or any other area, knowing how to repair cracked floor tiles effectively can save you time and money. In this comprehensive guide, we’ll provide expert tips, detailed how-to guides, and answers to common questions about tile repair.
Understanding the Causes of Cracked Floor Tiles
Cracked floor tiles can result from various factors, including heavy impacts, structural shifts, improper installation, or even the natural aging of materials. Addressing these issues promptly is crucial to maintaining the integrity and appearance of your tiled surfaces.
How to Repair Cracked Floor Tile: Step-by-Step Guide
Tools and Materials Needed:
- Replacement tiles (if necessary)
- Tile adhesive
- Grout
- Grout sealer
- Tile spacers
- Notched trowel
- Grout float
- Chisel
- Hammer
- Utility knife
- Sponge
- Bucket
- Safety glasses and gloves
Step 1: Assess the Damage
Before starting any repair, assess the extent of the damage. If the crack is minor, it might be repairable without replacing the tile. For extensive damage, replacement might be necessary.
Step 2: Remove the Damaged Tile (If Necessary)
- Score the grout around the damaged tile using a utility knife to loosen it.
- Gently tap a chisel into the grout lines with a hammer to remove the grout surrounding the tile.
- Lift the tile out carefully. If it doesn’t come out easily, you may need to break it into smaller pieces and remove them gradually.
Step 3: Prepare the Surface
- Clean the area thoroughly to remove any remaining adhesive or debris.
- Ensure the surface is smooth and level before applying new adhesive.
Step 4: Apply Tile Adhesive
- Spread a thin layer of tile adhesive using a notched trowel.
- Place the new tile into position, pressing firmly to ensure good adhesion.
- Use tile spacers to maintain even spacing around the tile.
- Where to buy your adhesive: Topps Tiles, Tiles UK, Porcelanosa.
Step 5: Allow Adhesive to Set
- Let the adhesive dry for at least 24 hours to ensure the tile is securely in place.
Step 6: Grout the Tile
- Mix the grout according to the manufacturer’s instructions.
- Apply the grout using a grout float, ensuring it fills all the gaps around the tile.
- Wipe off excess grout with a damp sponge, being careful not to remove grout from the joints.
- Where to buy your grout: Topps Tiles, Tiles UK, Porcelanosa.
Step 7: Seal the Grout
- Once the grout has cured (typically 24-48 hours), apply a grout sealer to protect it from stains and moisture, HR Total Finish Matt is a perfect choice for your Grout Sealer.
Q&A: Common Questions About Tile Repair
Q: How do I know if I need to replace the tile or just repair it?
A: Minor cracks or chips can often be repaired with a suitable filler or adhesive. However, if the tile is extensively damaged or loose, replacement is usually the best option.
Q: Can I repair cracked grout myself?
A: Yes, repairing cracked grout is a relatively straightforward process. Remove the damaged grout with a utility knife, clean the area, and apply new grout.
Q: What causes grout to crack and how can it be prevented?
A: Grout can crack due to movement in the substrate, improper mixing, or insufficient curing time. Using a flexible grout and ensuring proper installation can help prevent cracking.
Q: How often should grout be sealed?
A: Grout should be sealed every 1-2 years to protect it from stains and moisture.
Why Choose Professional Tile Repair Services?
While DIY tile repair is possible, professional services ensure a high-quality, durable finish. At Hardfloor Restoration, our experienced technicians use advanced techniques and high-quality materials to repair and replace tiles efficiently and effectively. We handle everything from minor grout repairs to extensive tile replacements, ensuring your floors look as good as new.
Contact Hardfloor Restoration
For expert tile repair services in Manchester, Sale, Alderley Edge, Hale, Bowdon, Hale Barnes, and The Mere, contact Hardfloor Restoration today. Let our skilled team restore the beauty and functionality of your tiled surfaces with professional care and precision.

Marble floor grout repair.